Početna podešavanja za PostfixAdmin mail server
Nakon što ste se ulogovali na mail server, potrebno je da izvršite početne postavke:
Dodavanje administratora
https://portal.mcloud.rs/knowledgebase/article/88/dodavanje-novog-administratora/
Dodavanje domena
Da biste mogli da formirate mail naloge, morate dodati domen u mail server.
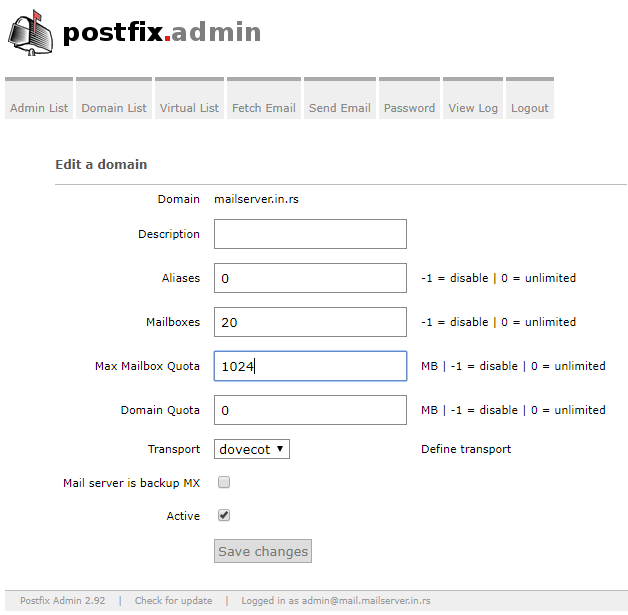
Izaberite opciju Domain List iz glavne navigacije. Prilikom dodavanja domena ujedno određujete i koliko cete na domenu moci da otvorite alijasa, mail naloga, kolika će im biti kvota. Ova podesavanja se mogu menjati kasnije klikom na edit opciju. Na slici je primer setovanja servera:

Domain: u ovo polje se unosi samo ime domena (bez www, http://)
Description: u ovo polje možete uneti bilo šta. Opis je samo za vaše potrebe
Aliases: broj alijasa (virtuelnih email adresa) koje možete napraviti na domenu. Ova opcija se može onemogućiti upisivanjem -1 u polje. Da biste dozvolili neograničen broj alijasa na domenu, napišite 0 u polju.
Mailboxes: broj mailbox-ova (fizičkih email adresa) koje možete napraviti na domenu. Ova opcija se može onemogućiti upisivanjem -1 u polje. Da biste dozvolili neograničen broj mail naloga na domenu, napišite 0 u polju.
Max Mailbox Quota: Najveća dozvoljena veličina mailbox-a. Ovde je kao primer stavljeno 1024 MB (odnosno 1 GB). Postavljanjem 0 u polje, dozvoljavate neograničenu veličinu mailbox-a, odnosno popunjavanje dokle god ima prostora na disku servera. U primeru je upravo ovako setovano.
Domain quota: Ovaj parametar određuje koliko je ukupno zauzeće kvote dozvoljeno na domenu. Postavljanjem 0 u polje, dozvoljavate neograničenu veličinu mailbox-a, odnosno popunjavanje dokle god ima prostora na disku servera.
Transport: ovo je oblik transporta e poste. Potrebno je da odaberete Dovecot pošto je to režim rada u kojem server obrađuje lokalnu dostavu mailova korisnicima.
Ostale opcije nisu obuhvaćene u ovoj konfiguraciji.
Mail server is backup mx: Napredna opcija koja podrazumeva da imate više mail servera koji su međusobno sinhronizovani u radu. Stoga ovo pollje nemojte aktivirati.
Active: Ova opcija služi da dosadašnja setovanja za domen stavite u finkciju ili ne. Ovom opcijom trenutno aktivirate ili suspendujete sve aktivnosti za navedeni domen.
Add default mail aliases: ukoliko štiklirate ovu opciju, platforma će automatski dodati alijase abuse, hostmaster, postmaster, webmaster na mail server. Da bi prijem pošte preko automatski kreiraniha aliasa bio moguć neophodno je da ih usmerite na “fizičke” email naloge. Više u sekciji dodavanje email naloga /aliasa korisnika.
DNS podešavanja za mail server
Za domen koji ste uneli prilikom poručivanja, odnosno aktivacije servisa, automatski će se formirati mail podešavanja na vašem serveru. Svaki sledeći domen koji dodate na server kasnije treba da bude vezan za ovaj domen (da koristi isti MX record) radi ispravnog funkcionisanja maila. Sve detalje pogledajte u ćlanku DNS podešavanja za mail server.