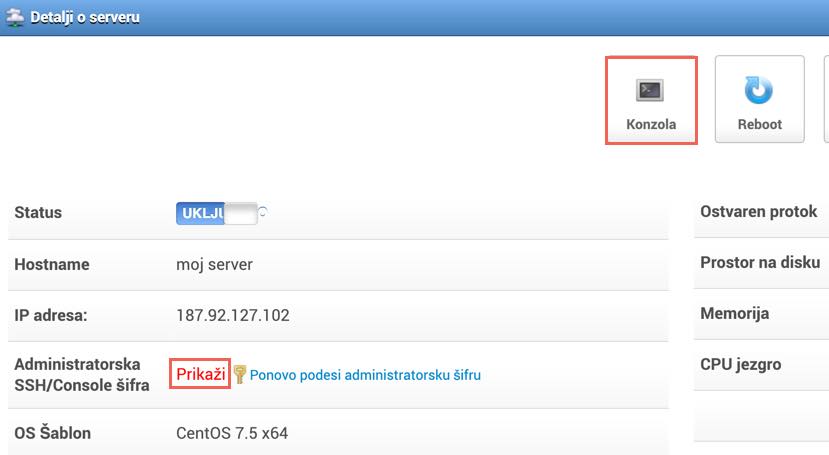
Ulogujte se na svoj server
Uogujte se na mCloud portal i otvorite stranicu svog servera, a potom:

- Kliknite opciju Konzola.
- Unesite svoje korisničko ime: "root"
- Unesite svoju lozinku (da biste videli svoju lozinku, kliknite Prikaži unutar polja Administratorska SSH/Console šifra)
Instalirajte EPEL
Da biste mogli da instalirate Fail2ban, neophodno je da prvo instalirate EPEL (Extra Packages for Enterprise Linux):
sudo yum install epel-releaseInstalirajte Fail2ban
Nakon što ste instalirali EPEL, izdajte sledeću komandu kako biste instalirali Fail2ban:
yum install fail2banPotom izdajte sledeću komandu da biste uključili Fail2ban:
systemctl enable fail2banOsnovna konfiguracija
Konfiguracioni fajl za Fail2ban se nalazi u folderu /etc/fail2ban. Tu se nalazi i fajl sa originalnim podešavanjima koji se zove jail.conf. S obzirom na to da ovaj fajl može da bude prepisan sa svakim upgrade-om, bolje je da ga ne menjate, već da napravite novi koji će se zvati jail.local.
Sve vrednosti koje su definisane u jail.local fajlu će automatski da prepišu sve što se nalazi u jail.conf fajlu. Otvorite novi fajl koristeći nano (ili bilo koji drugi tekst editor):
nano /etc/fail2ban/jail.localUnesite sledeći sadržaj:
[DEFAULT]# Ban hosts for one hour:
bantime = 3600
# Override /etc/fail2ban/jail.d/00-firewalld.conf:
banaction = iptables-multiport
[sshd] enabled = true
Pomoću ovih parametara podesićete novo vreme za banovanje (1 sat) za sve servise, kao i da se za firewall knofguraciju koristi iptables. Konačno, ovim ćete da uključite sshd jail. Sledeći korak je restartovanje fail2ban servisa pomoću sledeće komande:
systemctl restart fail2banDa biste proverili da li je servis pokrenut, izdajte sledeću komandu:
fail2ban-client status